Thursday, October 23, 2008

Lightroom 2 Adventure

There's been a bunch of new books on the market ... as always happens when a new version is released. I came across Photoshop Lightroom 2 Adventure by Mikkel Aaland and really loved it, so I had to share a bit about it.

First off, I like the premise: learning the tools wrapped in an adventure format - traveling around Tasmania and Iceland. There's a lot of information to digest, and the adventure format helps you to digest it easily. Plus the interesting stories related to the pictures used keeps things lively.

Also, it was cool to see a small feature on each of the contributing photographers. My particular favourites were the self-portrait of Maki Kawakita (pg 180-1) and Peter Eastway's Peninsula Storm (pg. 8-9).

And there's tons of tips and tricks throughout - like pressing L to engage the Lights Out feature. Give it a try - it's great for presentations.

Check it out on O'Reilly by clicking here. It's definitely worth the read.

Thursday, October 16, 2008

PPhotoshop and Lightroom Integration - Part 3

If we've checked the Stack with original box on the way out to Photoshop, the rest of the process should be an easy one. Once you've preformed your clarification in Photoshop and saved the copy file, it should be tucked neatly away with the original in the same folder when you are done.


For the "what should I do in Photoshop?" question ... click here.

In other news ... Adobe Labs has a released candidate for Lightroom 2.1 available for download. Check it out by clicking here.

Thursday, October 9, 2008

Photoshop and Lightroom Integration - Part 2

I've received a bunch of e-mails about working Lightroom into the workflow. Lightroom is great for managing your photos and/or getting them off of your camera. It's also a great little program for making quick adjustments. But what about using it with Photoshop? It's really easy.

We just looked at setting up Lightroom to make this process as easy as possible. Now, let's look at how it works.

After you've imported the image and made whatever adjustments are necessary in Lightroom, click on Cmd-E/Ctrl-E to open the Edit with Photoshop dialog. You can also find it in the menu by clicking on Photo>Edit In>Edit in Adobe Photoshop CS3 (assuming you have CS3 loaded, of course).


You are then presented with a dialog box and three options.
  1. Edit a Copy with Lightroom Adjustments - (RAW shooters, this is your only option) this applies the adjustments that you just made in Lightroom to the image, then opens it up in Photoshop.
  2. Edit a Copy - just like it sounds, you'll open up a copy of the image in Photoshop ... but the Lightroom adjustments won't be applied.
  3. Edit Original - again, just like the box says ... we're working on the original image here. It should go without saying that this option is not recommended for our work.
For me, I choose the first option most of the time. After all, what's the point of using the cool correcting features of Lightroom, only to abandon them on the way to Photoshop?


Stack with original should be checked so that Lightroom will keep your Photoshop edited version with the original image, making it easier to keep organised.

Next we'll see what happens when we get to Photoshop and back again. Until then, enjoy.

Wednesday, October 1, 2008

Photoshop and Lightroom Integration - Part 1

One of the first things we need to do in working these two programs together is to get our Preference settings synchronised.


In the Lightroom Preferences, click on External Editing. You'll be given a series of choices. For File Format, I generally choose PSD because it results in smaller files sizes. Choosing PSD has its issues, as the dialog describes (we'll go over this later). Regular readers of my blogs will already know my preference for ProPhoto RGB as the Color Space to work in, as well as the benefits of working in 16 bit mode. For Resolution, I've chosen what works best with my particular printer.

Once I've set these, I can move on to Photoshop to make sure that these two are playing nicely together. Upon choosing PSD, Lightroom warns us that we need to make sure that we select Maximize Compatibility in Photoshop or we'll face dire consequences, up to and including death by flogging. To do this, we open the Preferences dialog in Photoshop.


In the File Handling section, we can select to Always Maximize PSD Compatibility. You can set it to Ask, but you'll quickly tire of clicking the OK button each time.

In the next installment, we'll look at what happens when you want to move from Lightroom to Photoshop. Until then ... enjoy.

Integration questions explored

We're at a crazy time right now. CS4's been announced and everyone is rushing to put together their tutorials and re-write their books. Things are little different with us. We've got to wait to get the shipping version of the software, then validate our processes with the new tools.

With that in mind, many will not be upgrading to CS4 in their workflow right away. Sure they may be one of the first to purchase the new gear (myself included), but it'll take a while to integrate it into the day to day action.

So, in the mean time, we'll look at the integration of Lightroom 2 and PSCS3 - using the two together and bouncing between them. This series of posts will serve to answer a ton of questions received over the last month. And ... it'll give us something to work on rather than going stir-crazy waiting for CS4 to ship.

Until then ... enjoy.

Thursday, September 25, 2008

Catalogs - getting everything together

When last we met, we were working on exporting catalogs. We looked at the quick and easy way to get out images out of Lightroom for discovery. But the quick and easy way did not get us all the information. We wanted something more.

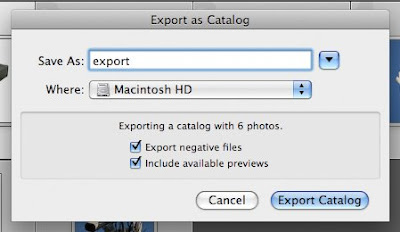
That something more is Export negative files.


With the Export negative files option checked, you will include the original or master photos as well as the catalog info. Depending on how many files you need to export, this process could take some time. You'll want to make sure that you have at least 200MB of disk space available for Lightroom to use as a scratch area.

Including the available previews sends all the Library Grid thumbnails, Loupe views and 1:1 views as part of the export. Make sure that you've rendered your previews before exporting. To do this, go to the Library Module and click on Library>Previews>Render Standard-Sized Previews. You can also choose to render the 1:1 (full resolution) previews from Library>Previews>Render 1:1 Previews. This preview export comes in handy if something happens to the master negatives. Without the negatives, you won't be able to re-render the images.

Exporting in this way insures that all data is sent for discovery. Next week, we'll look at getting these files from someone else and importing them into Lightroom.

Thursday, September 18, 2008

Catalogs continued

In the last post on this subject, I mentioned that Lightroom isn't exactly a multi-user program. With that in mind, how do you share information and catalogs? It's actually quite easy.

The Export feature is designed to allow the sharing of catalogs between different computers running the same version of Lightroom. For discovery purposes, we can export images or an entire catalog. Assuming opposing council's expert has the same version of Lightroom, they should be able to import the catalog and see what we've done.

In the Library module (or the Filmstrip), simply select the relevant images and choose File>Export as Catalog. The dialog box will open and you will select a location to save the new catalog (you can't export images into or combine images with an existing catalog using this method). This will export the images along with basic metadata. This is what makes a catalog export different from a normal file export ... you get everything that's associated with the files.

This basic method is fine for everyday use. But for us, we need something more. We want to be able to export the catalog and include the master files as well, in their native state. In the next installment, we'll see just how easy it is.

Until then, enjoy.

Thursday, September 11, 2008

Thanks for your support!

Well, we didn't quite make the Blurb's Readers Choice Award. But, as a way of saying thanks to all for your continued support, Blurb is offering $10 off the book - Forensic Photoshop. Just enter offer code friendofblurb08 at checkout. Hurry! The offer expires at midnight, Sept. 30, 2008.

Thanks again for all of your continued support.

Lightroom Catalogs

One of the things that I first noticed when looking at Lightroom for law enforcement was how and where the program stores images. The Lightroom Catalog (it used to be a Library in version 1), is the one stop shop for all of your images and associated data. This is both good and bad.

The good news:
When you first install Lightroom, a default catalog is created for you. Most writers have opted for a single catalog workflow, choosing instead to manage their files within the same catalog. For our purposes, it may be necessary (for eDiscovery reasons) to keep each case's files within it's own catalog. In this way, there is no blending of file info across cases. Luckily, creating a new catalog is easy enough. Just click File>New Catalog. Choose an appropriate name (like the case file number) and location ... and you're off to the races. When you want to open an existing catalog, just click File>Open Catalog. This leads us to the bad news.

The bad news:
Lightroom does not allow you to work on several catalogs at once. Neither can you search within a catalog that is not open. This one can become a huge issue as your case files grow. You also aren't allowed to save the catalog to a network share for use by others.

With this in mind, we'll spend September exploring the catalog structure of Lightroom and working through a logical structure and workflow for using catalogs effectively in law enforcement.

Until next week, enjoy.

Thursday, September 4, 2008

Behind the scenes

Whilst at Adobe for the NATIA convention, I had the pleasure of meeting and chatting with Tom Hogarty, Lightroom's Product Manager. He was friendly and extremely forthcoming about what Lightroom can do today, what they want it to do in the future, and what its limitations are. (No, I can't reveal all of their secrets).

Lightroom News recently published an interview with Tom. Check it out by clicking here. I think that you'll see why he is one of Adobe's all stars.

Tuesday, September 2, 2008

vote early - vote often

Forensic Photoshop - the book - is entered in the Photography Book Now contest at Blurb. I'm up against over 1700 books. How can I possibly stand out in the crowd?

One of the categories is the People's Choice Award. I need your help and this is where you come in. If you like what you've seen, click here and voice your opinion. Your support is what keeps this blog going strong ... and free.

Vote early and vote often (just kidding ... they've got the cookies set to only allow one vote per person). In this political season, everyone is wondering who will get the vote for President. I'm hoping to get your vote for People's Choice.

As always, thanks for your support.

Thursday, August 28, 2008

Killer Tips

One of the benefits to NAPP membership is the wealth of information available on Lightroom. Check out the Lightroom Killer Tips blog from NAPP and Adobe. We're heading off for the long weekend. There's a wealth of info there to help quench your Lightroom learning thirst until we return.

If you still haven't joined NAPP, click on the link on the side bar. You won't regret it.

Until then, enjoy.

Thursday, August 21, 2008

easy to see


Once you've imported your images into Lightroom, you'll need a handy way of keeping track of everything. This becomes a huge issue as your collection grows and expands across several hard drives.

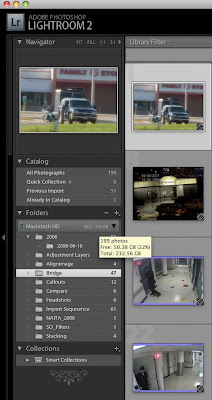
Thankfully, Lightroom has a solution for this. It's called the Volume Browser. You'll find it in the Library Module's Folder Panel. It displays the name of the hard drive that the files are stored on, even if you disconnect the drive.

You can also see how much drive space is being used and how much is left. How cool is that?

Until next time, enjoy.

Lightroom and NAPP

Lightroom has been a regular feature of Photoshop User Magazine since it was first released. Since then, NAPP has done of ton of work highlighting this amazing program.

If you are a serious Lightroom user, or considering adding Lightroom to your enterprise ... consider a membership in the National Association of Photoshop Professionals. You won't be disappointed.

Where everyone learns Photoshop - National Association of Photoshop Professionals

Thursday, August 14, 2008

Lightroom Certification

For those interested in certification, the Lightroom Adobe Certified Expert exam is now available. If you are going to take the test, check out the exam prep at Examaids.

Enjoy.


Thursday, August 7, 2008

Importing images

We'll start the discussion on importing images into Lightroom 2 by looking at those images that were captured by another device and already exist on our system (internal or external storage device). Select File>New Catalog to start with a fresh catalog. When we do, Lightroom will relaunch and you'll see a screen that looks like this - an empty catalog viewed in the Library Module.


The Import button is located on the lower left of the Library Module. Press it and you'll see the Import dialog box - source selection screen. If you have an external device connected, camera, flash drive, etc., it'll show up as a choice to import from. For this exercise, we are going to select Choose Files.


I have some photos from one of my favourite Scottish photographers, Scott M. Liddell that I want to import into Lightroom. I use the Import Photos dialog to browse to the storage location and select the relevant files. In this case, I selected all of the files in the folder. Click on the Choose button.


Once selected, I am presented with another dialog box. Lightroom looks at the file data and determines that I have selected 8 photos that were taken between January 21, 2006 and July 26, 2007. It wants to know what I want to do with them. In File Handling, I can choose to Add the photos to the catalog without moving them to a new location, I can copy them to a new location and add them to the catalog (they will be left at the old location as well), I can move them to a new location and add them to the catalog, or I can copy them as Digital Negatives and add them to the catalog. As these are JPEGs on a flash drive, I'll just add them to the catalog and leave them where they are.


If Lightroom suspects that there are duplicate images within those that you've selected - vs. what's already in the catalog, it can leave those alone if you select Don't re-import selected duplicates.

You can choose to apply some pre-selected Develop settings, apply a Metadata template, apply keywords, and choose how your Initial Previews are handled. I tend to not apply develop settings, choosing instead to do the work to the photos individually or within Photoshop later. I have a stock Metadata template that I can apply - but in this case I won't (they are Scott's files in this case). I'll set up some basic keywords for now, ones that apply to all of the images. Then I'll click on Import.


Depending on how many files you have to import, it'll take between a few seconds and a few minutes to bring everything in. If you are Importing everything that you have for the first time, it may take an hour or longer.

Next we'll look at some other variations on importing images into Lightroom. Until then, enjoy.

Thursday, July 31, 2008

Lightroom 2 is here!

Well, a week has gone by and a lot has changed in the wonderful world of Lightroom. For starters, Adobe released version 2. With the release, a whole slew of books, blogs, and web sites have sprung up to help users understand why "this is an incredibly significant upgrade ... so hurry and get your copy today."


There have been a few changes to the interface, some subtle and some profound. 
  • The 6 panels on the left of the Library module have been reduced to 3, helping eliminate the fluff and improving productivity.
  • Collection Sets. You can create collections by area, crime type, or any number of criteria ... and then import your images into these collections.
  • Suggested Keywords. When you assign a keyword to an image, that keyword becomes a suggested keyword for the other images imported or captured around the same time. This could help speed things up quite a bit.
  • Multiple Monitor Support. You've got two monitors. Why not use them both?
  • The Retouch Brush. Local corrections come to Lightroom.
  • Print to JPEG. You can build a contact sheet and "print it" to a JPEG file for sharing or archiving.
... and there's so much more.


Hopefully, you've been thinking about the questions posed last week. You'll need the answers to follow along with the next post - getting your images into Lightroom. With the timing of the release, I've put the schedule back a week to offer everyone the time to upgrade to version 2. Yes, we'll be using LR2 for the tutorials.

Until then, enjoy.

Thursday, July 24, 2008

Should I be using Lightroom?

Small aside to begin with: not to overwhelm myself with blogs, I've chosen to make this blog a weekly (whereas the Forensic Photoshop blog tends to be almost daily).

Coming out of Julieanne Kost's Lightroom demo at Adobe last week, the majority of the questions centered around a single point, "should I be using Lightroom in my lab?" Let's begin to take a look at that question.

Lightroom provides a great workflow solution. It's great for photographers who are taking a ton of shots and then quickly share the best of these shots with clients. But what about us? Is it worth the investment in time and money?

Think about the way in which you interact with your "customers." Do they come in and wait for a finished product? Are they close by? Are they in a different part of the state? Do you need to securely transfer your finished work across the net?

Lightroom has it's pitfalls and its good points. The key is (as always) workflow. Take a look at your workflow. Examine how you interact with those that you support. Examine how you manage your files, from the shot to archive. How many images do you process in a given week? How fast do you need to get them out of your lab? What is your agency's retention policy? How do you interact with your discovery team in terms of e-discovery?

Put these things in the back of your mind as you work. Next week, we'll begin to look at Lightroom and explore the answers to "should I be using Lightroom."

Until then, enjoy.

Monday, July 14, 2008

Digital Asset Management

In a previous post on the Forensic Photoshop blog, I mentioned that I'm looking at a few Digital Asset Management options. Specifically, I am working with Filemaker's Bento and Adobe Photoshop Lightroom to see which will work for me, what the issues are going to be, pitfalls, good points, must haves and so forth.

I'm just about ready to post a long series on my findings. So before I start with the how-to and whatnot, I wanted to do the series to let you know all of the issues, ins-outs, and so forth. As with any new technology it's best to sort things out first, before dropping it into your workflow.

Stay tuned.

Wednesday, May 28, 2008

Lightroom eSeminar


You are invited to join the good folks at Adobe for this eSeminar on Adobe Photoshop Lightroom this Friday, May 30th, at 1pm PST.

Click on the image below for the details on how to access the Connect session. I am curious to see how well attended this session will be. Based on attendance, we may schedule other Connect sessions in the future.


Friday, April 25, 2008

Starting things off

Stay tuned as I work through setting up this space. I was thinking about just adding Lightroom posts on the Forensic Photoshop blog. But giving Lightroom its own space just seemed easier to manage for all concerned.

With that in mind ... welcome to Forensic Lightroom.