Thursday, October 9, 2008

Photoshop and Lightroom Integration - Part 2

I've received a bunch of e-mails about working Lightroom into the workflow. Lightroom is great for managing your photos and/or getting them off of your camera. It's also a great little program for making quick adjustments. But what about using it with Photoshop? It's really easy.

We just looked at setting up Lightroom to make this process as easy as possible. Now, let's look at how it works.

After you've imported the image and made whatever adjustments are necessary in Lightroom, click on Cmd-E/Ctrl-E to open the Edit with Photoshop dialog. You can also find it in the menu by clicking on Photo>Edit In>Edit in Adobe Photoshop CS3 (assuming you have CS3 loaded, of course).


You are then presented with a dialog box and three options.
  1. Edit a Copy with Lightroom Adjustments - (RAW shooters, this is your only option) this applies the adjustments that you just made in Lightroom to the image, then opens it up in Photoshop.
  2. Edit a Copy - just like it sounds, you'll open up a copy of the image in Photoshop ... but the Lightroom adjustments won't be applied.
  3. Edit Original - again, just like the box says ... we're working on the original image here. It should go without saying that this option is not recommended for our work.
For me, I choose the first option most of the time. After all, what's the point of using the cool correcting features of Lightroom, only to abandon them on the way to Photoshop?


Stack with original should be checked so that Lightroom will keep your Photoshop edited version with the original image, making it easier to keep organised.

Next we'll see what happens when we get to Photoshop and back again. Until then, enjoy.

Wednesday, October 1, 2008

Photoshop and Lightroom Integration - Part 1

One of the first things we need to do in working these two programs together is to get our Preference settings synchronised.


In the Lightroom Preferences, click on External Editing. You'll be given a series of choices. For File Format, I generally choose PSD because it results in smaller files sizes. Choosing PSD has its issues, as the dialog describes (we'll go over this later). Regular readers of my blogs will already know my preference for ProPhoto RGB as the Color Space to work in, as well as the benefits of working in 16 bit mode. For Resolution, I've chosen what works best with my particular printer.

Once I've set these, I can move on to Photoshop to make sure that these two are playing nicely together. Upon choosing PSD, Lightroom warns us that we need to make sure that we select Maximize Compatibility in Photoshop or we'll face dire consequences, up to and including death by flogging. To do this, we open the Preferences dialog in Photoshop.


In the File Handling section, we can select to Always Maximize PSD Compatibility. You can set it to Ask, but you'll quickly tire of clicking the OK button each time.

In the next installment, we'll look at what happens when you want to move from Lightroom to Photoshop. Until then ... enjoy.

Integration questions explored

We're at a crazy time right now. CS4's been announced and everyone is rushing to put together their tutorials and re-write their books. Things are little different with us. We've got to wait to get the shipping version of the software, then validate our processes with the new tools.

With that in mind, many will not be upgrading to CS4 in their workflow right away. Sure they may be one of the first to purchase the new gear (myself included), but it'll take a while to integrate it into the day to day action.

So, in the mean time, we'll look at the integration of Lightroom 2 and PSCS3 - using the two together and bouncing between them. This series of posts will serve to answer a ton of questions received over the last month. And ... it'll give us something to work on rather than going stir-crazy waiting for CS4 to ship.

Until then ... enjoy.

Thursday, September 25, 2008

Catalogs - getting everything together

When last we met, we were working on exporting catalogs. We looked at the quick and easy way to get out images out of Lightroom for discovery. But the quick and easy way did not get us all the information. We wanted something more.

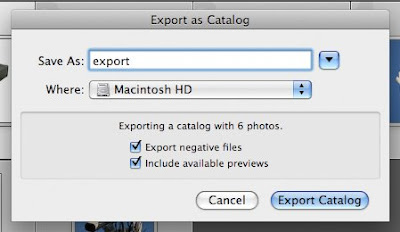
That something more is Export negative files.


With the Export negative files option checked, you will include the original or master photos as well as the catalog info. Depending on how many files you need to export, this process could take some time. You'll want to make sure that you have at least 200MB of disk space available for Lightroom to use as a scratch area.

Including the available previews sends all the Library Grid thumbnails, Loupe views and 1:1 views as part of the export. Make sure that you've rendered your previews before exporting. To do this, go to the Library Module and click on Library>Previews>Render Standard-Sized Previews. You can also choose to render the 1:1 (full resolution) previews from Library>Previews>Render 1:1 Previews. This preview export comes in handy if something happens to the master negatives. Without the negatives, you won't be able to re-render the images.

Exporting in this way insures that all data is sent for discovery. Next week, we'll look at getting these files from someone else and importing them into Lightroom.

Thursday, September 18, 2008

Catalogs continued

In the last post on this subject, I mentioned that Lightroom isn't exactly a multi-user program. With that in mind, how do you share information and catalogs? It's actually quite easy.

The Export feature is designed to allow the sharing of catalogs between different computers running the same version of Lightroom. For discovery purposes, we can export images or an entire catalog. Assuming opposing council's expert has the same version of Lightroom, they should be able to import the catalog and see what we've done.

In the Library module (or the Filmstrip), simply select the relevant images and choose File>Export as Catalog. The dialog box will open and you will select a location to save the new catalog (you can't export images into or combine images with an existing catalog using this method). This will export the images along with basic metadata. This is what makes a catalog export different from a normal file export ... you get everything that's associated with the files.

This basic method is fine for everyday use. But for us, we need something more. We want to be able to export the catalog and include the master files as well, in their native state. In the next installment, we'll see just how easy it is.

Until then, enjoy.

Thursday, September 11, 2008

Thanks for your support!

Well, we didn't quite make the Blurb's Readers Choice Award. But, as a way of saying thanks to all for your continued support, Blurb is offering $10 off the book - Forensic Photoshop. Just enter offer code friendofblurb08 at checkout. Hurry! The offer expires at midnight, Sept. 30, 2008.

Thanks again for all of your continued support.

Lightroom Catalogs

One of the things that I first noticed when looking at Lightroom for law enforcement was how and where the program stores images. The Lightroom Catalog (it used to be a Library in version 1), is the one stop shop for all of your images and associated data. This is both good and bad.

The good news:
When you first install Lightroom, a default catalog is created for you. Most writers have opted for a single catalog workflow, choosing instead to manage their files within the same catalog. For our purposes, it may be necessary (for eDiscovery reasons) to keep each case's files within it's own catalog. In this way, there is no blending of file info across cases. Luckily, creating a new catalog is easy enough. Just click File>New Catalog. Choose an appropriate name (like the case file number) and location ... and you're off to the races. When you want to open an existing catalog, just click File>Open Catalog. This leads us to the bad news.

The bad news:
Lightroom does not allow you to work on several catalogs at once. Neither can you search within a catalog that is not open. This one can become a huge issue as your case files grow. You also aren't allowed to save the catalog to a network share for use by others.

With this in mind, we'll spend September exploring the catalog structure of Lightroom and working through a logical structure and workflow for using catalogs effectively in law enforcement.

Until next week, enjoy.